Friday, July 2, 2010

Summer Project: Paver Patio

Out first-time home buyers tax credit left us with some funds. We used the majority to pay down debt, but decided to spend a bit on a home improvement. Since I don't teach this Summer, it was decided that I would undertake a Project in my spare time. (Please note: academics don't really have spare time. We have time where we don't have to be in a classroom, but we are still supposed to be doing other things.)

After much deliberation, we decided to build a low platform deck in the backyard. This would be a good thing since our house came with a small concrete slab that is a) unattractive, b) prone to flooding, and c) not very big.


After doing weeks of scholarly research into decks, my will began to flag. Decks require lots of cuts. Hammering is hard. The Ms. didn't seem very enthused about my Project either. An anonymous gentleman from the Internet suggested we all (i.e. humans generally) build paver patios instead, as they are easier than decks and require less maintenance. Zounds, that is an idea.

So, we decided to do a concrete paver patio because

  1. it is more durable, if built correctly, than a deck.
  2. it requires no tedious nails or screws, nor periodic refinishing
  3. the Ms. prefers the Olde Worlde graveltas of stone
  4. the man from the Internet said it would be easier
STEP 1: PLANNING AND LAYOUT (1 day)
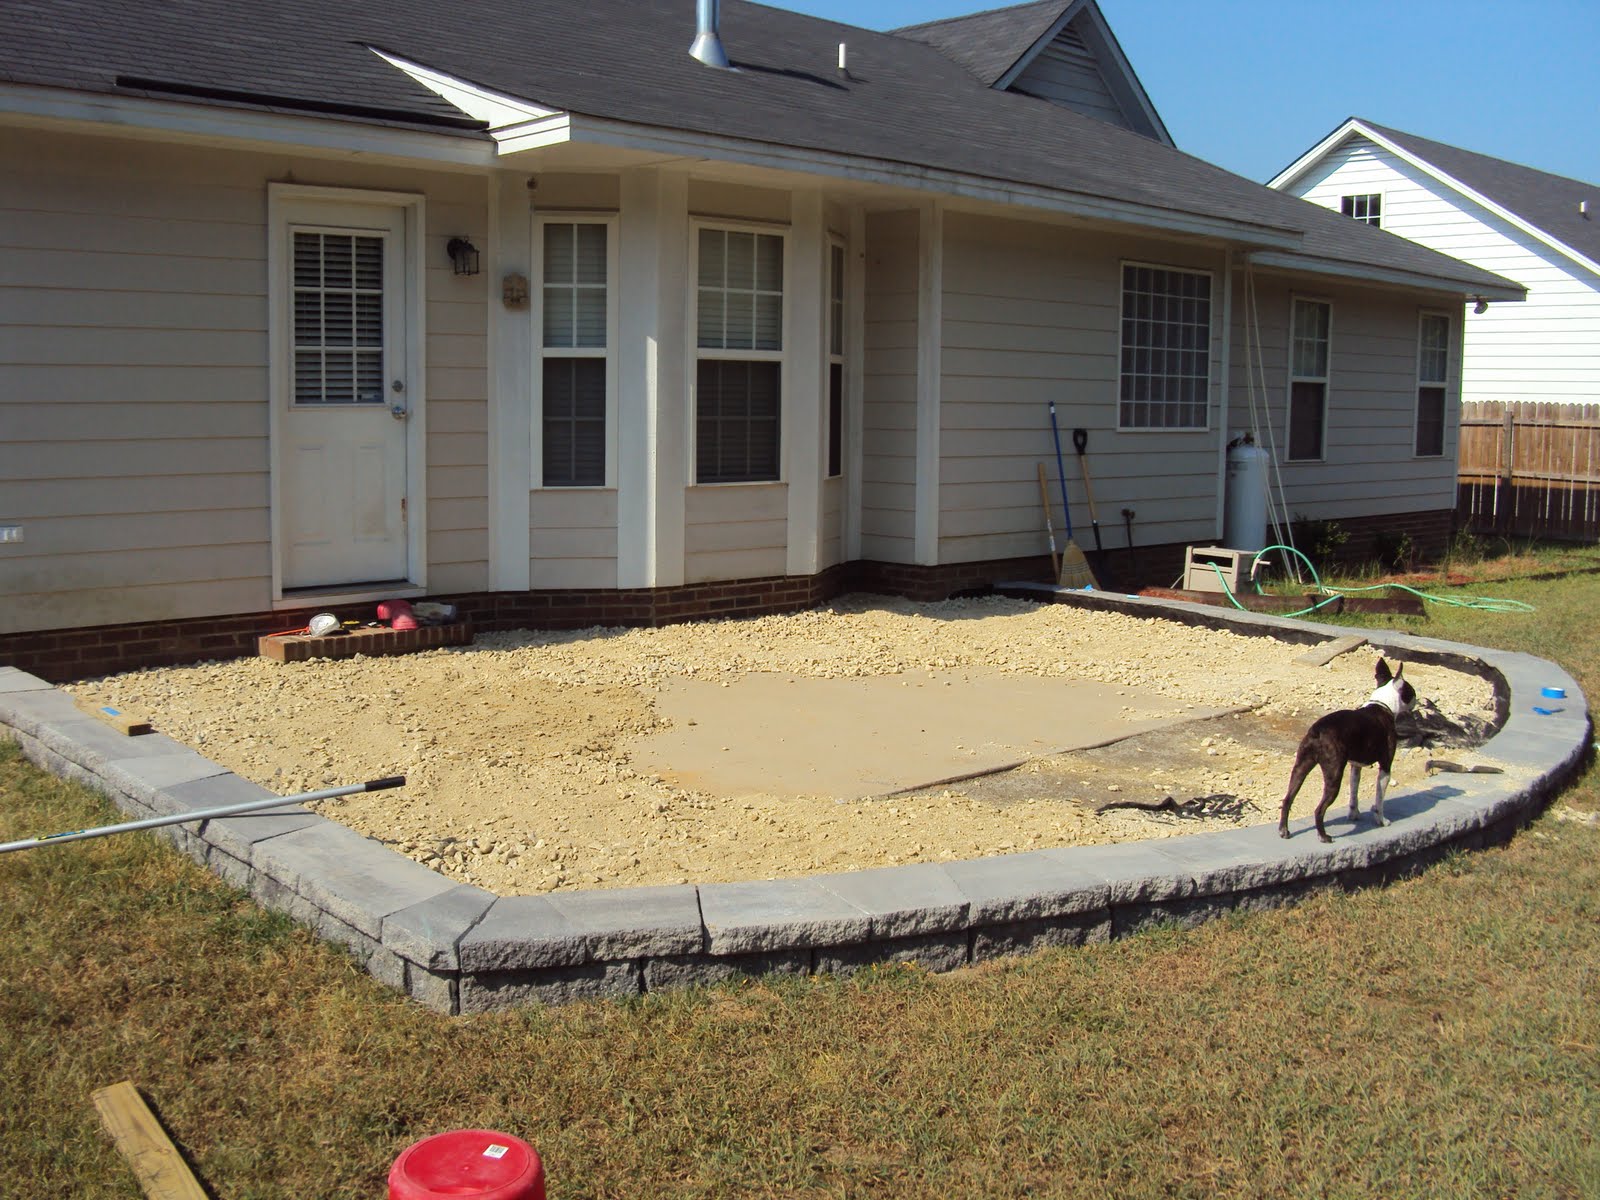
The patio, at approx. 22'x16' would be fairly larger than the current slab. Masons cord and stakes were used to make sure the patio would be level from west to east, and gently sloped away from the house for drainage. A curved apron would make things prettier, but annoying.


STEP 2: EXCAVATION (1 week)
In a professional job, one would jackhammer that 4 inch thick concrete slab, and haul it away, but I am either lazy, cheap, or reasonable, and so I left it. To remedy the different soil densities, the areas around the slab were excavated to a depth of 2-3 inches and backfilled with crushed gravel.


STEP 3: RETAINING WALL (2 weeks)
Normally, a paver patio is done below ground so the tops of the pavers are flush with or slightly above grade. We're building on a slab, so this whole patio needs to be raised 6 inches. So, we need a retaining wall to keep the pavers and delicious patio filling contained.

First we need to order materials. In the end, we had approximately 15 tons of gravel, sand, and block delivered to the driveway, with only a single trusty wheelbarrow to get it all to the backyard.


Then a trench was dug down 5 inches, backfilled with 2 inches of compacted gravel, on which the first row of wall blocks was placed... half below grade to keep them from shifting outwards.


Getting these blocks level was a nightmare. Eventually, 3 inch caps were put on top of the blocks.


STEP 4: LAYING THE BASE (2 days)
Then we added 3 inches / 4 tons of crushed gravel and compacted it with a really heavy orange machine (actually called a plate tamper).


STEP 5: BRICKLAYING (1 week)

Next we used screed pipes to put down a 1.5 inch bed of sand over the whole area and place the pavers on top. The pavers are designed to be placed randomly. The Ms. thought this should be a pattern that only has the appearance of randomness. But no, the pavers are designed to be laid out in a truly random fashion.


The curved uneven shape of the patio required lots of cut pavers. In lieu of renting a masonry saw, I fit an angle grinder with a diamond blade and commandeered the jungle gym for a work bench, much to the toddler's dismay.


STEP 6: JOINT FINISHING (1 day)

The pavers have small gaps between them to allow for joint sand to get in between them and friction lock them in place. 

Without joint sand: (ignore the swollen pregnancy abdomen obscuring the foreground)

We used a polymeric joint sand that hardens with water. This keeps ants and weeds from infiltrating the sand, as well as protects from rainstorm washouts. Here's a shot after sweeping sand into the joints, compacting, sweeping more sand, compacting, sweeping more sand, then activating with water.


The tops of the new pavers come up flush with the old brick step, so I used leftover pavers to make a new step.


The finished product... (although the color is washed out from joint sand residue)


Final Reckoning:

Time to complete: 4 weeks
Materials Used: 15 tons
Average Working day temperature: 96 F
Tools broken: 1
Fingers smashed: 3
Shins scraped: 3
Gatorade consumed: 3-4 gallons
Toads Displaced: 7

Monday, April 5, 2010

Farm and Garden

Reasons why I want to grow vegetables:
1. we have a huge back yard
2. produce apparently grows really well here year-round
3. I'm tired of paying like $9 for a head of lettuce

Luckily for us, the previous owners of our house built a fenced in area in the back yard for their dogs that will serve as the perfect enclosed garden to keep our dog out! The Portly Groundskeeper was nice enough to build me some raised planters for the garden area back in March, and I've finally started a few crops!

I have peas and onions in the big box, with room for tomatoes, cucumbers, and carrots now that the weather is warmer. Actually, we had about 8 days of Spring and now it's in the 80s and 90s, so I better plant the others soon!

In my herb garden I've got oregano (ore-gaah-no if you're British), parsley, and basil. They're all doing fairly well, but not growing as fast as I'd like, because I really want to be that person who cooks with home-grown herbs.

And lastly, I planted two blueberry bushes. The tags on the blueberry bushes say that it's best to plant two separate species next to each other to promote cross-pollination, and therefore a better crop. These aren't looking so healthy right now because our soil is so dense with clay that the roots may not be getting enough air and drainage. I should have requested a third raised bed before the builder's back went out making the other two!

I did try to plant some lettuce back in March. Because the weather wasn't quite warm enough then, I started them in a little starter-kit you can buy at the local garden store (Lowe's for me). The starter-kit has 50 little dehydrated pellets of pitch, each in its own little circle-compartment, on a single tray. You're supposed to water the pitch to make them grow an inch or two, then bury the seeds into the raised dirt. You keep the whole tray in indirect sunlight inside the house so it stays warm, and a few days later you've got sprouts! Once it's warm enough outside you can transplant the pellets and seeds to the ground. This is why you see little white baggy-looking things around the herb plants.

I followed these directions, but maybe I put too many seeds in each dirt pellet, or maybe the transfer was too traumatic. Whatever the case, only two lettuce sprouts survived the transfer into the ground, and it's doing alright so far. Next time I will be patient and plant seeds directly into the ground so as to avoid transfer trauma!

Saturday, April 3, 2010

Bespoke Poke Smoke

Carolina barbecue. It's pork. On this side of the state they use vinegar and hot sauce. Its pulled or shredded. Fine. That recipe has potential. But I have a complaint. Most barbecue places I've visited since I moved here don't bother smoking their meat, you guys. I know. Now I'm going to be charitable and assume this is because I've been going to the wrong places, and not because Carolina doesn't bother with smoke. If there's one thing this part of the country excels at, it's overindulging on meat and smoking. So, just to be sure we're on the same page, here is my tribute to Carolina barbecue.

Step 1: Buy your meat. In Texas we prefer brisket, but here the go-to cut is pork shoulder. Either a picnic cut or Boston butt will do. I picked the butt (which is really the front of the shoulder) because it's more conducive to puns.

Step 2. Marinate. The night before you cook, soak your butt (see?!). I use a combination of apple juice, apple cider vinegar, worcestershire sauce, smashed garlic cloves, olive oil, some citrus juice (this time I had some old limes laying around), a dash of hot sauce, sugar, and salt. I also had some white wine that I needed to use, but don't tell anyone I foo-fooed my barbecue with it. This is really more an art than a science, so as long as you have some acid, sugar, and salt, be a Picasso, man.

Step 3. Rub. After a soak, you need to take your butt out of the buttjuice (how fun is this?) and pat it dry with paper towels. Then liberally massage with your choice of dry rub. The point of dry rub is that a slow cooking piece of meat will exude all kind of juices, which will wash off most liquid sauces and junk. A good firm rub will get into the cracks, and dissolve INTO the juices, penetrating the meat. I use a mixture of brown sugar, salt, paprika, black pepper, and cayenne. For the pork, I added some cumin.

Step 4. Smoke. Smoke is the essence of barbecue. Without smoke, barbecue is something else. It's meat cooked outside. Now, a brisket or pork shoulder is a nasty piece of meat, filled with connective tissue, fat, collagen, and elastins. If you were to just grill it, it would be tought, spongy and gross. BUT. If you cook it slowly (like all day) over low heat, all that hoary gristly nasty melts away into sweet sweet nectar. The key is to cook your meat 90 minutes / pound at around 200-250 F. again, when you cook something for 9 hours, it's more of an art than a science, and these cuts of meat are forgiving.

Now, you could do the whole cooking time in the oven, but that's just a roast. I'm not you're Aunt Betty. I don't make roasts. Conveniently, a smoker will produce low levels of heat while bathing your butt in delicious carcinogenic vapor.

I don't have a proper smoker, but I do have a large charcoal grill. Here's my setup:

One one side, I have a small mound of coals, covered in woodchips. On the other side, the meat. If I place the lid on, and the vent open above the meat (not above the chips), the air current carries a stream of smoke over the meat constantly.


Ignore the lighter fluid, it plays no meaningful role in this process.

Periodically, I have to put new soaked wood chips on the pile of embers to keep things going. Wet chips smoke more and last longer. Soak your chips for an hour in water. I found that an extra couple charcoal briquettes every hour keeps the embers from going out.


Keep the smoke going as long as possible. I have problems keeping it up. There, I've said it. Usually, my embers die out before the meat is done. Finishing in the oven is nothing to be ashamed of, it hapens to lots of guys. As long as your meat has had 4-6 hours of smoke. But ideally, you'll do the whole thing in the smoke.


As of 10:35 am this pork butt is about 30% done. Notice the deep purplish color. Smoke reddens a meat, and then blackens it. This should be as black as coal when it comes off the rack. Not charred, but coated in pleasure.

Carolina style pulled pork is then shredded, served with a vinegar sauce, and sometimes put on buns. But if you've smoked and rubbed it appropriately, the sauce will be for the Philistines.

Vernal Vengeance

Many ancient religions (and contemporary religions as well) reenact the cycle of the seasons in their rituals. Most rituals begin with an acknowledgment of Winter's mortification--an empty lifeless state. Then, a rite of purgation or cleansing occurs (Spring cleaning, anyone?). Next: invigortion--an attempt to bring new life into the world. Finally, a celebration of the return of life. This pattern can be found in ancient Babylonian festivals and Catholic mass. And in our front yard.

All of our mortificant shrubs and trees are slowly awakening. the creeping phlox was first to show:

Incidentally, this variety is the "Flirty Eye Creeping Phlox," which is my new pick for best fictional venereal disease EVAR!

Next, the Japanese Cherry tree decided to wake up. I was worried in the Fall, but this one seems to love our yard.


Our Redbud tree is also beginning to show, albeit coyly. We have just a tiny spray of color around its ankles.


More on this tree later in the season. Legend has it, that this is the tree from which Judas hanged himself. Its wood is so weak, because it refuses to allow suicides to ever happen again, preferring its own flesh to be broken and torn instead. How's that for some medieval atonement theology? Happy Easter weekend!!

Even our Zombie Crepe Myrtle is starting to moan and shuffle. In the Fall, I decided I didn't like its shape, and overzealously pruned it. Turns out that plants need leaves to survive though. Go figure. This time, I won't cut these little guys off.


Yay Spring!!

Belated Ice Worries

This should have been posted 2 months ago, but we noticed, in the really cold weeks of January, that we had some weird fortress-of-solitude type crystal growth emerging from the turf. Odd, yes? Hoary gelid stalagmites. (You can always remember that stalagmites push up from the ground mightily, while stalagtites hang tight to the ceiling).


The ground between the house and the air conditioning unit is pretty much a cesspool. It's always very wet due to the condensation drainage from the outside unit and a drain pipe from the inside unit. I'm guessing that's what caused this.

A few weeks ago, after the thaw, I dropped a socket wrench from 3 feet, and the thing sank into the muck up to the head. Looked exactly like this:


We've put in a splashpad to redirect some of the moisture away from the foundation, but that won't change the fact that we live in the swamps of sadness. But, you know, happier.

Thursday, January 7, 2010

Rage Against the Beige

When we moved in, one of thing that we liked about the house was that we wouldn't have to do a lot of painting. Then we moved our stuff in and realized that the living room was the perfect storm of beige. Beige carpet. Light beige furniture. Dark beige walls.


Well, Christmas came, and the elves brought me multiple gift cards to Lowe's and this:

a 10-inch laser-guided miter saw!

The elves explained to me it could be used to do lots of things, like cut chair rails and molding, butcher exotic cuts of dinosaur meat, or install hardwood flooring. "Just look at those Lowe's gift cards!" the elves chittered, "think of the possibilities!"

The Ms. declared we would repaint the living room. We would install chair rail. We would hang drapes. It would be a glorious new era of post-beige domesticity. More than anything else, it would be blue. Let the amateur carpentry begin!


One thing to consider when picking a paint color is photons. Photons are factually awesome. Lighter colored surfaces bounce back more photons into a room, creating more light, while darker colored surfaces absorb the photons, leaving a darker room.


Since the living room already has limited natural light, and the dark walls sucked out even more light, we decided on a two-tone blue scheme. "Sea Mist"on top of the chair rail, and "Grassy Lake" below.


this joint looks crooked, but it isn't

After a lot of tape masking, priming, painting, touching up, cutting molding, measuring, coping joints, mitering joints, finish nailing, puttying of mistakes, caulking, even more painting, and the rearranging of furniture, I think we've got a much brighter, more open, and colorful room.


Before


After


Now we just need to replace the carpet... (that's what literary folk call foreshadowing).